
3 Reasons Why You Should Consider Chatbot for Your Facebook Ads
May 7, 2021
Explore Your Customer Journey Map
June 22, 2021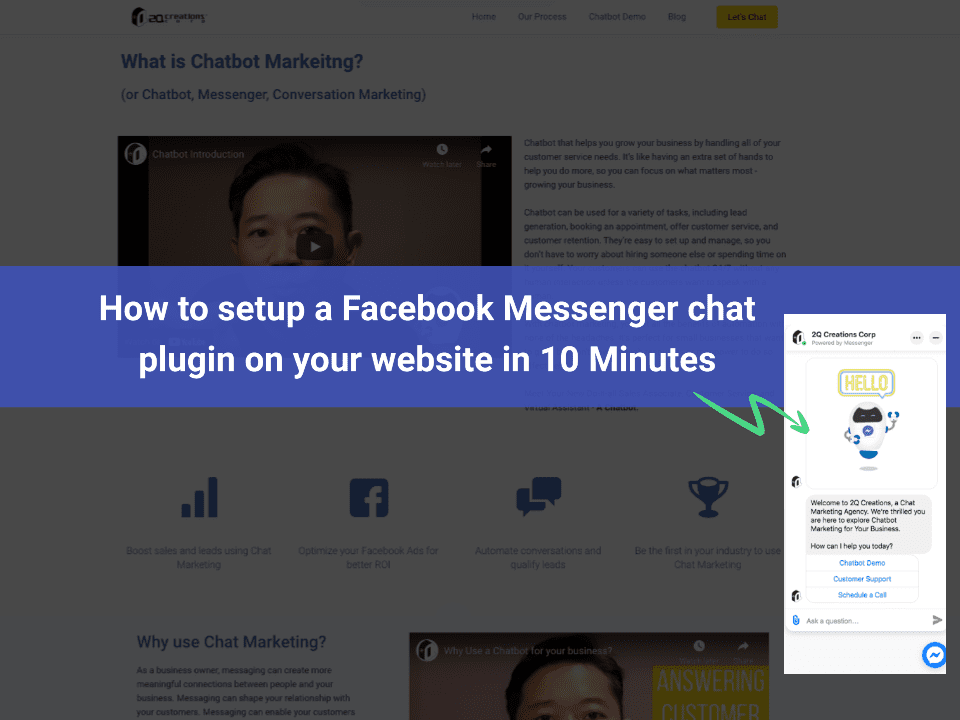
Do you want to give your customers the best possible experience? Of course, that's what any business wants. Most businesses focus on customer support in a number of ways: tickets, email, live support, phone.
If you own a Facebook Page and a website, we'll show you how to level up your customer support by installing a Facebook Messenger chat widget directly on your website in 10 minutes. You can now offer real-time support on your website without having to install a third-party plugin and it's easy and free!
Let's Get Started!
What is the Facebook Messenger Chat Widget
Facebook Messenger Chat Plugin is a website plugin that businesses with a Facebook Page can install on their website. This allows your website visitors to start a conversation with your business via Messenger by clicking on the Messenger logo shown on your website.When someone initates a conversation with your business via the Messenger chat plugin, it automatically loads recent history between them and your company. This gives you a single experience for customers and enables you to continue the conversation even after they have left your webpage through messegner.com or Mesesnger App.
Benefits of using a Messenger chat plugin for your website
While there are so many other website support plugins available, why should you consider to use Messenger Chat widget on your website:How to Install a Facebook Messenger Chat Widget
Before you install the Facebook Messenger Chat Widget, you will need to have a Facebook page for your business. If you don't have one, read this article on how to create a Facebook PageStep 1: Add Messenger to your website
1. Goto your Facebook Page >> Settings > Messaging2. Click [Add Messenger to your website] > Click [Get Started]
Step 2: Setup Chat Widget
1. Click [Set Up] button on the upper right hand corner2. Set Language: Choose the language for your Chat Plugin
3. Add Domains: Include https:// and your domain with and without the www prefix (ie, add https://www.2qcreations.com and https://2qcreations.com)
4. Copy Code: Copy the code or send an email to yourself.
5. Paste Code: You'll need to insert this code into the Header Section of your website. Consult your web developer if you don't know how to do it.
Step 3: Chat Widget Customization
Welcome Message
Create a short welcome message when a visitor starts chatting with you on your websiteFrequently Asked Questions
We all want to serve our customers at the highest level but sometimes we just don't want to answer the same question over and over again. Think about the Top three questions people ask the most and create FAQ to answer them.With the chat widget plugin, you're allowed to create 3 questions and responses by simply input the question and the answer under the Frequently Asked Questions section.
Customize Your Chat Plugin
There are Five options to customize your chat plugin experience. Let's walk through each one of themGreeting
Greet people before they send a message. Your greeting will only appear in the Chat Plugin on your website and not in conversations on Facebook or Messenger.Guess Chat
This is a new feature which enables users to chat with your business without logging into the Facebook Messenger. Some visitors want to chat anonymously; when you enable this setting, as soon as someone leaves the chat room, you will be unable to continue the conversationCustom Color
Choose a chat widget plugin color that matches your brand colors.Alignment
You have the option to choose to align the chat widget to the left or right side of your website. I prefer to leave it on the right side.Conclusion
Congratulations! You have now set up your Facebook Messenger Chat Widget on your website. Your visitors will now be able to chat with you when they visit the page.If you would like to take your customer support up a notch, automate your customer support with a chatbot so you don't need to worry about responding to an inquiry at 3:00am on Sunday.


